본문으로 건너뛰기

절2.9랭크 정리

목표
  1. 랭크 정리를 이해하고 활용하는 법을 익힙니다.
  2. 그림: 랭크 정리.
  3. 정리: 랭크 정리.
  4. 용어: 랭크, 퇴화차수.

이 절에서는 지금까지 해 온 모든 작업의 정점인 랭크 정리를 소개합니다.

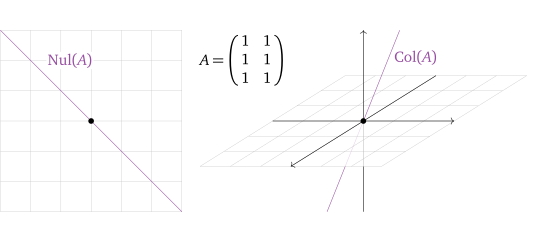
독자는 행렬의 열공간과 영공간 사이에 어떤 관계가 있음을 눈치챘을 수도 있습니다. 이 예제 in 절 2.6에서 3\times 2 행렬의 열공간과 영공간은 둘 다 직선이며, 각각 \R^2와 \R^3에 놓여 있습니다:

\begin{tikzpicture}[myxyz, scale=.8]
\begin{scope}[resetxy]
  \draw[grid lines] (-3,-3) grid (3,3);
  \draw[seq4] (-3,3) -- (3,-3);
  \point at (0,0);
  \node[seq4,fill=white, inner sep=1pt] at (-.7,2) {$\Nul(A)$};
\end{scope}

\begin{scope}[xshift=9cm]
  \path[clip, resetxy] (-6,-4) rectangle (6,4);

  \def\v{(1, 1, 1)}
  \node[coordinate] (X) at \v {};

  \draw[seq4] (0,0,0) -- ($-6*(X)$);
  \draw (0,0,-3) -- (0,0,0);

  \begin{scope}[transformxy]
    \fill[white, nearly opaque] (-3, -3) rectangle (3, 3);
    \draw[grid lines] (-3, -3) grid (3, 3);
    \draw[->] (-3,0) -- (3,0);
    \draw[->] (0,-3) -- (0,3);
  \end{scope}

  \draw[seq4] (0,0,0) -- node[right, pos=.7] {$\Col(A)$} ($6*(X)$);
  \draw[->] (0,0,0) -- (0,0,3);

  \point at (0,0,0);
\end{scope}

  \node[fill=white, resetxy] at (5, 2) {$A = \mat{1 1; 1 1; 1 1}$};

\end{tikzpicture}

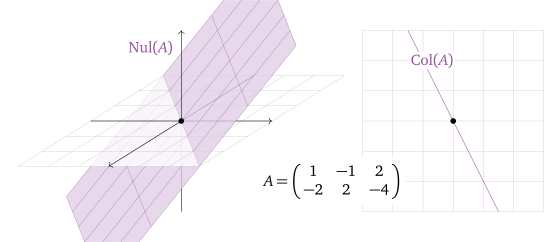
이 예제 in 절 2.4에서 2\times 3 행렬 \bigl(\begin{smallmatrix}1&-1&2\\-2&2&-4\end{smallmatrix}\bigr)의 영공간은 \R^3의 평면이고, 열공간은 {1\choose-2}가 생성하는 \R^2의 직선입니다:

\begin{tikzpicture}[myxyz, scale=.8]
\begin{scope}[xshift=9cm, resetxy]
  \draw[grid lines] (-3,-3) grid (3,3);
  \draw[seq4] (-1.5,3) -- (1.5,-3);
  \point at (0,0);
  \node[seq4,fill=white, inner sep=1pt] at (-.7,2) {$\Col(A)$};
\end{scope}

\begin{scope}
  \path[clip, resetxy] (-6,-4) rectangle (6,4);

  \def\v{(1, 1, 0)}
  \def\w{(-2, 0, 1)}

  \node[coordinate] (X) at \v {};
  \node[coordinate] (Y) at \w {};

  \draw (0,0,-3) -- (0,0,0);

  \begin{scope}[x=(X), y=(Y), transformxy]
    \path[clip] (-5, 0) -- (-5, -5) -- (5, -5) -- (5, 0) -- cycle;
    \fill[seq4!30, nearly opaque] (-3,-2) rectangle (3,2);
    \draw[step=1cm, seq4, very thin] (-3,-2) grid (3,2);
  \end{scope}

  \begin{scope}[transformxy]
    \fill[white, nearly opaque] (-3, -3) rectangle (3, 3);
    \draw[grid lines] (-3, -3) grid (3, 3);
    \draw[->] (-3,0) -- (3,0);
    \draw[->] (0,-3) -- (0,3);
  \end{scope}

  \begin{scope}[x=(X), y=(Y), transformxy]
    \path[clip] (-5, 0) -- (-5, 5) -- (5, 5) -- (5, 0) -- cycle;
    \fill[seq4!30, nearly opaque] (-3,-2) rectangle (3,2);
    \draw[step=1cm, seq4, very thin] (-3,-2) grid (3,2);
  \end{scope}

  \draw[->] (0,0,0) -- (0,0,3);

  \node[seq4, anchor=south east] at (-3,-2.5,.5) {$\Nul(A)$};

  \point at (0,0,0);
\end{scope}

  \node[fill=white, resetxy] at (5, -2) {$A = \mat{1 -1 2; -2 2 -4}$};

\end{tikzpicture}

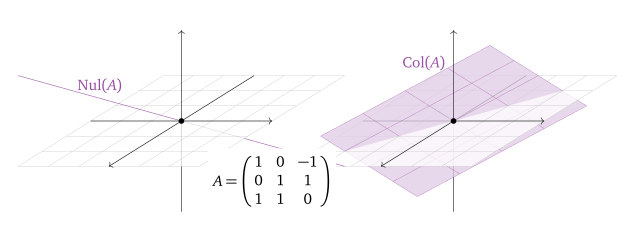
이 예제 in 절 2.4에서 3\times 3 행렬의 영공간은 \R^3의 직선이고, 열공간은 \R^3의 평면입니다:

\begin{tikzpicture}[myxyz, scale=.8]
\begin{scope}[xshift=9cm]
  \path[clip, resetxy] (-6,-4) rectangle (6,4);

  \draw (0,0,-3) -- (0,0,0);

  \def\v{(1, 0, 1)}
  \def\w{(-1/2, 1, 1/2)}

  \node[coordinate] (X) at \v {};
  \node[coordinate] (Y) at \w {};

  \begin{scope}[x=(X), y=(Y), transformxy]
    \path[clip] (-5/2, 5) -- (-5, 5) -- (-5, -5) -- (5/2, -5) -- cycle;
    \fill[seq4!30, nearly opaque] (-2,-2) rectangle (2,2);
    \draw[step=1cm, seq4, very thin] (-2,-2) grid (2,2);
  \end{scope}

  \begin{scope}[transformxy]
    \fill[white, nearly opaque] (-3, -3) rectangle (3, 3);
    \draw[grid lines] (-3, -3) grid (3, 3);
    \draw[->] (-3,0) -- (3,0);
    \draw[->] (0,-3) -- (0,3);
  \end{scope}

  \begin{scope}[x=(X), y=(Y), transformxy]
    \path[clip] (-5/2, 5) -- (5, 5) -- (5, -5) -- (5/2, -5) -- cycle;
    \fill[seq4!30, nearly opaque] (-2,-2) rectangle (2,2);
    \draw[step=1cm, seq4, very thin] (-2,-2) grid (2,2);
  \end{scope}

  \draw[->] (0,0,0) -- (0,0,3);

  \node[seq4, anchor=south east] at (-3,-2.5,0) {$\Col(A)$};

  \point at (0,0,0);
\end{scope}

\begin{scope}
  \path[clip, resetxy] (-6,-4) rectangle (6,4);

  \def\v{(1, -1, 1)}
  \node[coordinate] (X) at \v {};

  \draw[seq4] (0,0,0) -- ($-3*(X)$);
  \draw (0,0,-3) -- (0,0,0);

  \begin{scope}[transformxy]
    \fill[white, nearly opaque] (-3, -3) rectangle (3, 3);
    \draw[grid lines] (-3, -3) grid (3, 3);
    \draw[->] (-3,0) -- (3,0);
    \draw[->] (0,-3) -- (0,3);
  \end{scope}

  \draw[seq4] (0,0,0) -- node[above] {$\Nul(A)$} ($3*(X)$);
  \draw[->] (0,0,0) -- (0,0,3);

  \point at (0,0,0);
\end{scope}

  \node[fill=white, resetxy] at (3, -2) {$A = \mat{1 0 -1; 0 1 1; 1 1 0}$};

\end{tikzpicture}

모든 예에서 열공간의 차원과 영공간의 차원을 더하면 행렬의 열의 개수와 같습니다. 이것이 바로 랭크 정리의 내용입니다.

정의

행렬 A의 랭크는 \rank(A)로 쓰며, 열공간 \Col(A)의 차원입니다.

행렬 A의 퇴화차수는 \nullity(A)로 쓰며, 영공간 \Nul(A)의 차원입니다.

행렬 A의 랭크는 Ax=b의 해에 관한 중요한 정보를 알려 줍니다. 이 참고 in 절 2.3에서 Ax=b는 b가 A의 열들의 생성 안에 있을 때, 다시 말해 b가 A의 열공간 안에 있을 때 정확히 일관적이라는 것을 떠올려 보십시오. 따라서 \rank(A)는 Ax=b가 일관적이 되게 하는 b들의 집합의 차원입니다.

A의 랭크는 피벗 열의 개수와 같고(이 정리 in 절 2.7 참조), A의 퇴화차수는 자유변수의 개수, 즉 피벗이 없는 열의 개수와 같다는 것을 우리는 알고 있습니다(이 정리 in 절 2.7 참조). 피벗 열과 자유변수에 관한 내용을 요약하면 다음과 같습니다:

\begin{align*}
\rank(A) = \dim\Col(A) &= \text{the number of columns with pivots}\\
\nullity(A) = \dim\Nul(A) &= \text{the number of free variables}\\
&= \text{the number of columns without pivots}
\end{align*}

분명히

\begin{equation*}
\text{\#(columns with pivots)} + \text{\#(columns without pivots)}
= \text{\#(columns)},
\end{equation*}

이므로 다음 정리를 증명하였습니다.

다시 말해, 해가 있는 임의의 연립일차방정식에 대하여 다음이 성립합니다.

\begin{equation*}
\text{(dim of column span)} + \text{(dim of solution set)} =
\text{(number of variables)}.
\end{equation*}

랭크 정리는 우리의 주된 관심 대상인 두 가지, 즉 행렬의 영공간(Ax=0의 해집합)과 열공간(Ax=b를 일관적으로 만드는 벡터 b의 집합) 사이의 강한 관계를 보여 주므로, 실로 이 장의 정점이라 할 수 있습니다. x를 선택하는 자유도가 클수록 b를 선택하는 자유도는 작아지며, 그 반대도 마찬가지입니다.

랭크 정리는 선형대수학의 이론을 이용하여 연립방정식을 직접 풀지 않고도 그에 관해 정성적인 사실을 말할 수 있음을 보여 주는 대표적인 예입니다. 본질적으로 이것이 바로 이 학문의 힘입니다.